Using IPv6 with a Tunnel Broker
These instructions are adapted from the original document, http://iserv.nl/files/pfsense/ipv6/
This page details the process of getting IPv6 support with a Tunnel Broker in pfSense® software version 2.3.3 or above working. This guide can also work on older versions, but there may be minor differences in option locations or names.
Pitfalls
If the installation of pfSense software was upgraded from 2.0.x or before to 2.1 or above, IPv6 support must be enabled by navigating to System > Advanced on the Networking tab, and checking Allow IPv6. New 2.1 or above installs have this option enabled by default.
ICMP is required for IPv6 to work. If a firewall is in place on clients, make sure that ICMP over IPv6 is allowed.
If using a tunnel broker account, be sure to pick a provider as close to the pfSense firewall as possible. Latency can be a killer and will creep up in strange ways.
Building a Tunnel
Sign Up
This article assumes that an account has already been registered with Hurricane Electric or some other broker. After registering an account and getting the first /64 or /48 IPv6 block assigned, the gif tunnel may be configured on pfSense software.
Enable ICMP
Don’t forget to enable ICMP on the WAN interface, if ICMP is blocked the tunnelbroker will not allow a tunnel to be configured. The source IP address on this rule could be limited to the remote endpoint IP of the gif tunnel, or any. It could allow for all icmp or just echoreq.

Create GIF Interface
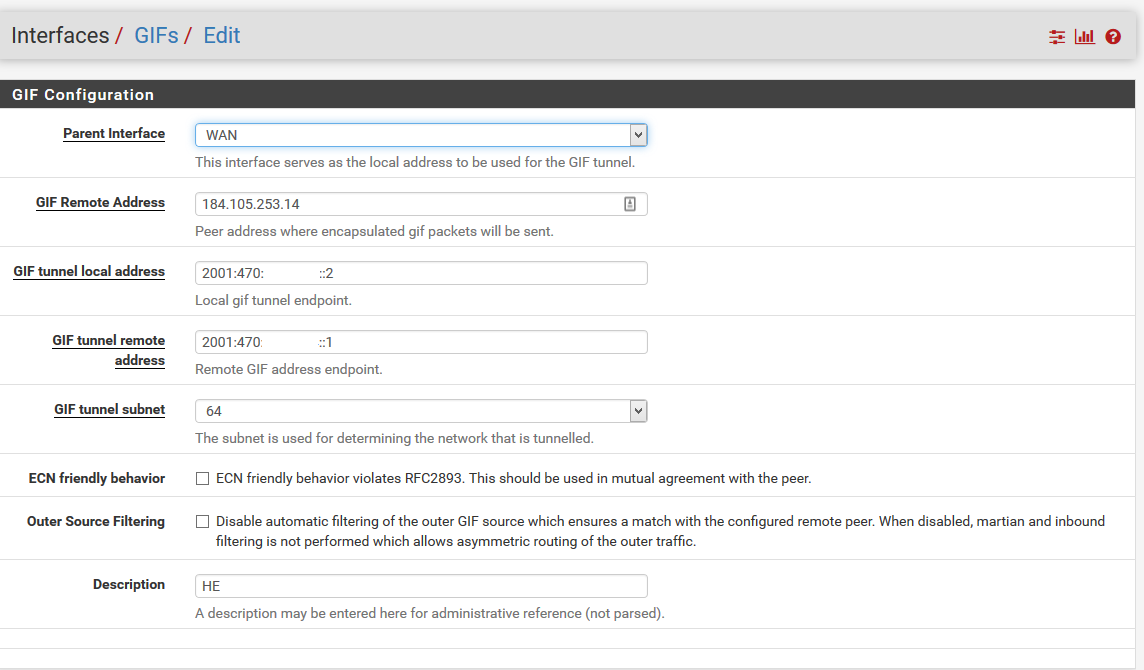
Now navigate to the assign gif interfaces screen on pfSense where the address information from Hurricane Electric or other may be entered. Interfaces > (Assignments), GIF tab.
The HE or other Server IPv4 address goes into the gif remote address
The HE or other Client IPv6 address goes into the gif tunnel local address
The HE or other Server IPv6 address goes into the gif tunnel remote address
The prefix length should be set to 64. After pfSense 2.1.1, the prefix length chosen for the IPv6 tunnel will be ignored and set to a prefix length of 128 On the interface assignments the interface will show a prefix length of 128.
Enter a Description and click Save.
Note: If a tunnel is being attached to a dynamic WAN IP, look at Keep the Tunnel Endpoint Up-To-Date later in this document.
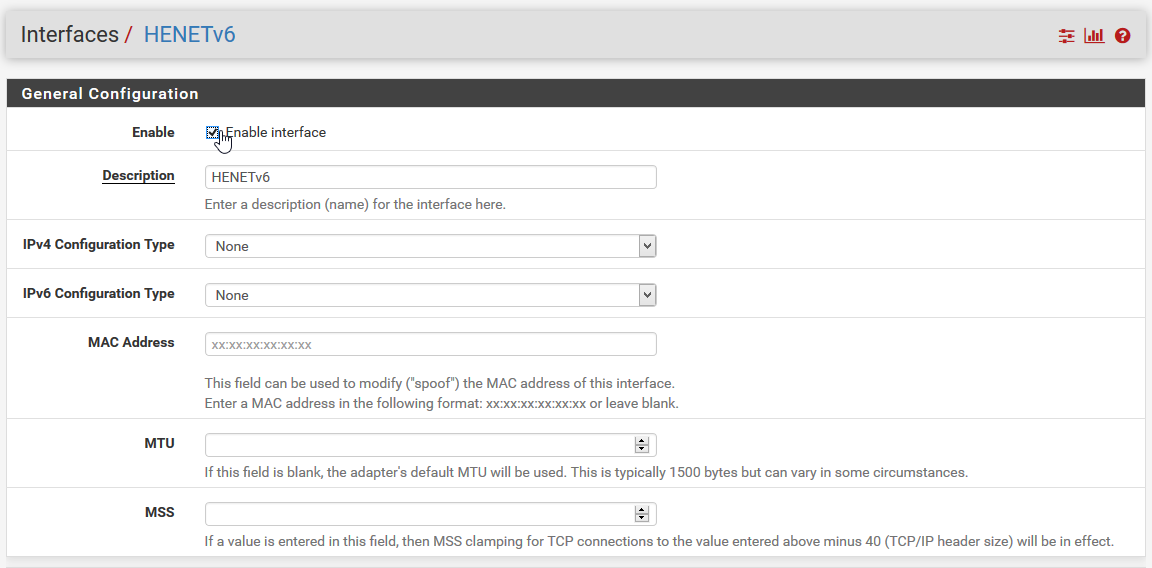
Assign GIF Interface
Click  on Interfaces > (Assignments) and choose the GIF interface
to be used for an OPT interface. In this example, the OPT interface has
been renamed HENETv6. Click Save and Apply Changes if they
appear.
on Interfaces > (Assignments) and choose the GIF interface
to be used for an OPT interface. In this example, the OPT interface has
been renamed HENETv6. Click Save and Apply Changes if they
appear.

Configure OPT Interface
With the OPT interface assigned, the OPT interface may be enabled from the Interfaces menu. Keep IPv6 Configuration Type set to None.
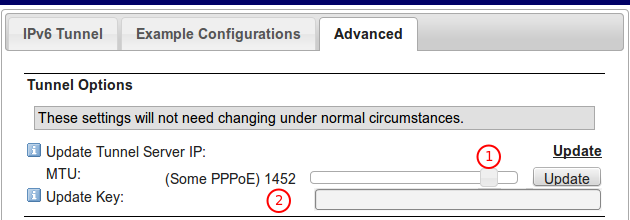
MTU Values
If the base interface for this IPv6 connection is a DSL line or other line with a lower MTU, the MTU may need adjusted here and on the other end to accommodate the lower value. On tunnelbroker.net, login to the account and edit the tunnel. In the Advanced options, move the MTU slider (1) until the MTU reads 1452 (2).
Set Gateway
A dynamic gateway entry will be automatically created for the tunnel. Now edit it and set the Default Gateway option, keeping the gateway field set to dynamic.
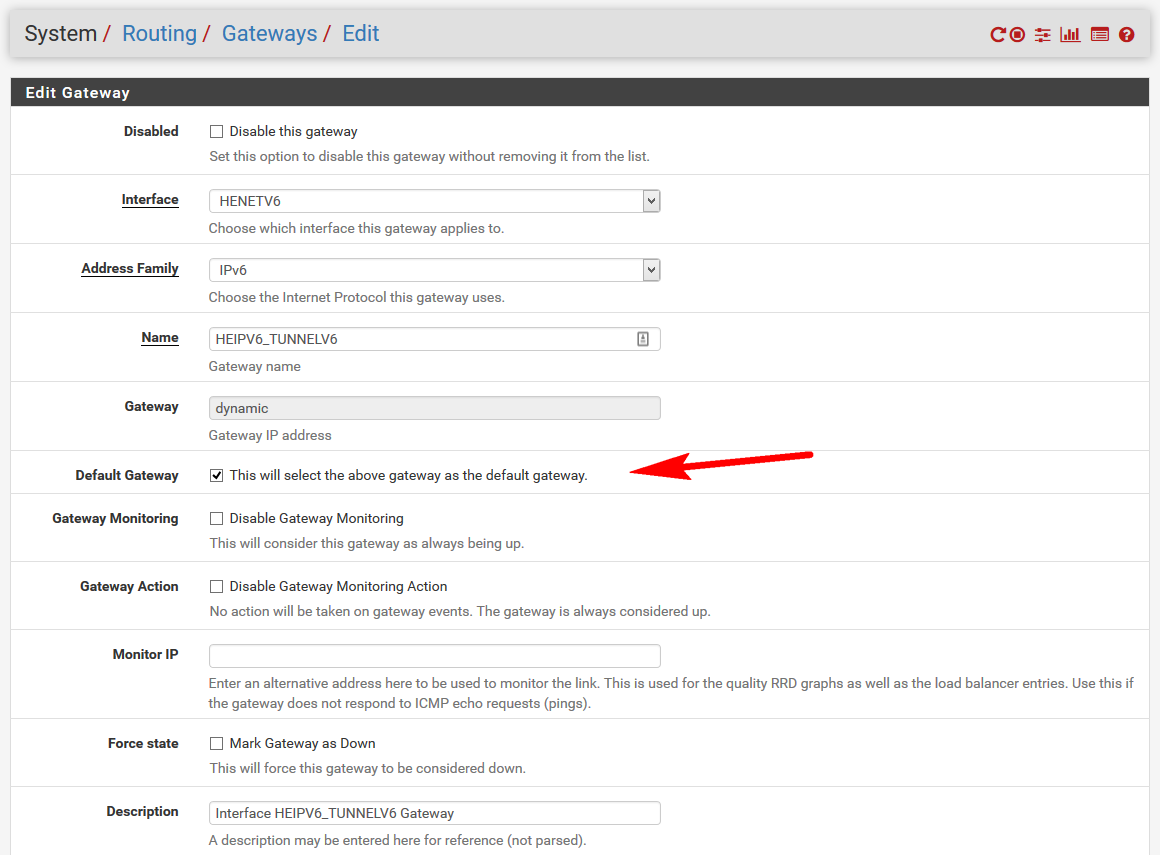
If all of the settings were entered correctly and the tunnel broker is working, the gateway will now be listed as online

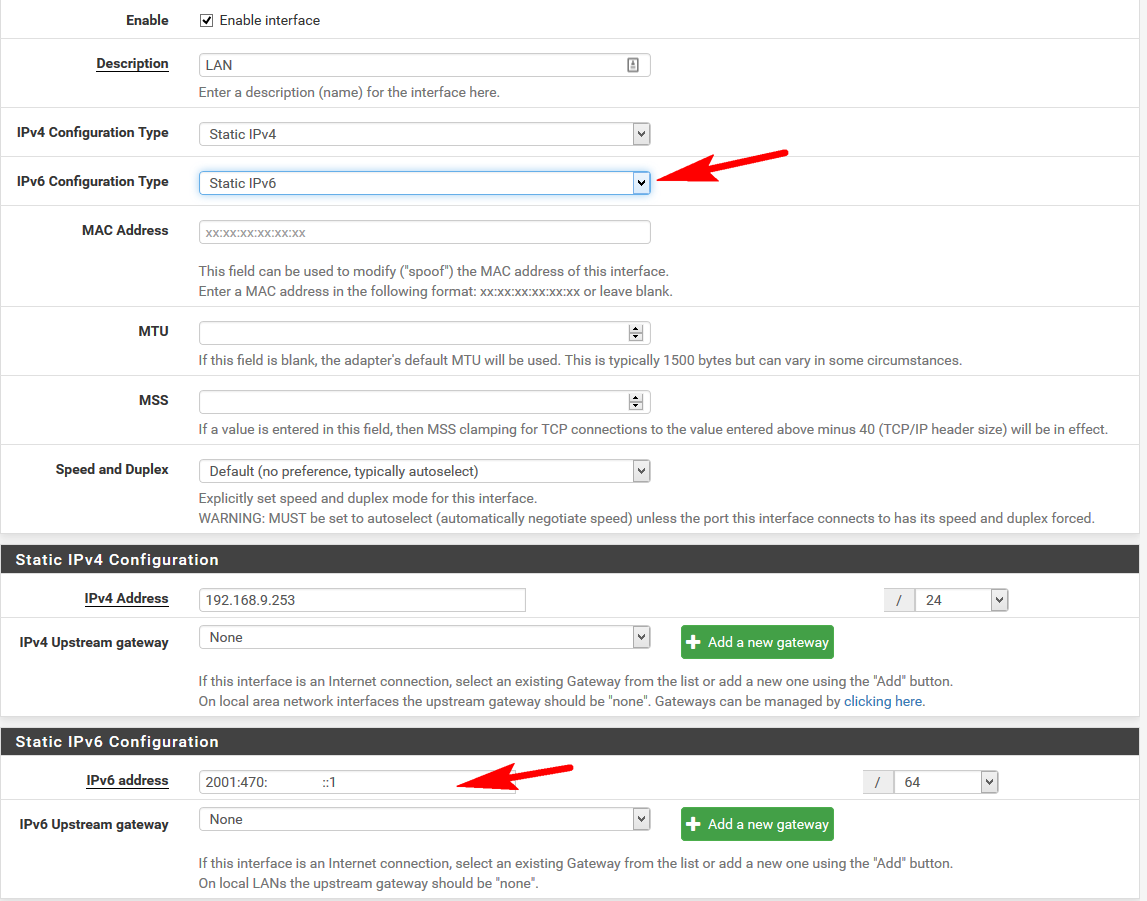
Set Up LAN for IPv6
The LAN interface may be configured for static IPv6 network. The network used for IPv6 addressing on the LAN Interface is an address in the Routed /64 or /48 subnet assigned by the tunnel broker. HE.net gives one automatically. It is important to note that the Routed /64 or /48 range is different from the Tunnel /64!
The example below uses ::1 as that is the easiest by far. Anything in the routed subnet works.
The Routed /64 or /48 is the basis for the IPv6 Address field
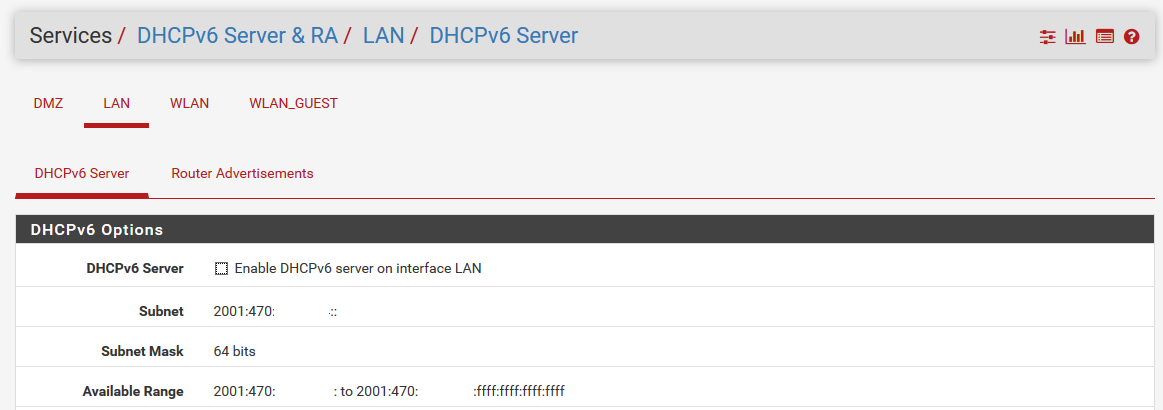
Set Up DHCPv6 and RA
Most configurations will want the computers on the LAN to automatically pick up the IPv6 Address instead of assiging it manually. To set this up, navigate to Services > DHCPv6 Server &RA.
On the Router Advertisements tab, there is a mode option where different types of router advertisement behavior may be chosen. Either unmanaged (advertise only), managed (dhcp6 only) or assisted (use stateless address with dhcp for the dns). See Router Advertisements and DHCPv6 Server for more details.
Add a rule to let IPv6 out
Now navigate to Firewall > Rules, LAN tab, and add a rule to pass IPv6 traffic out from LAN to any, just like the rule for IPv4.
Without an IPv6 allow rule, no traffic will get out.
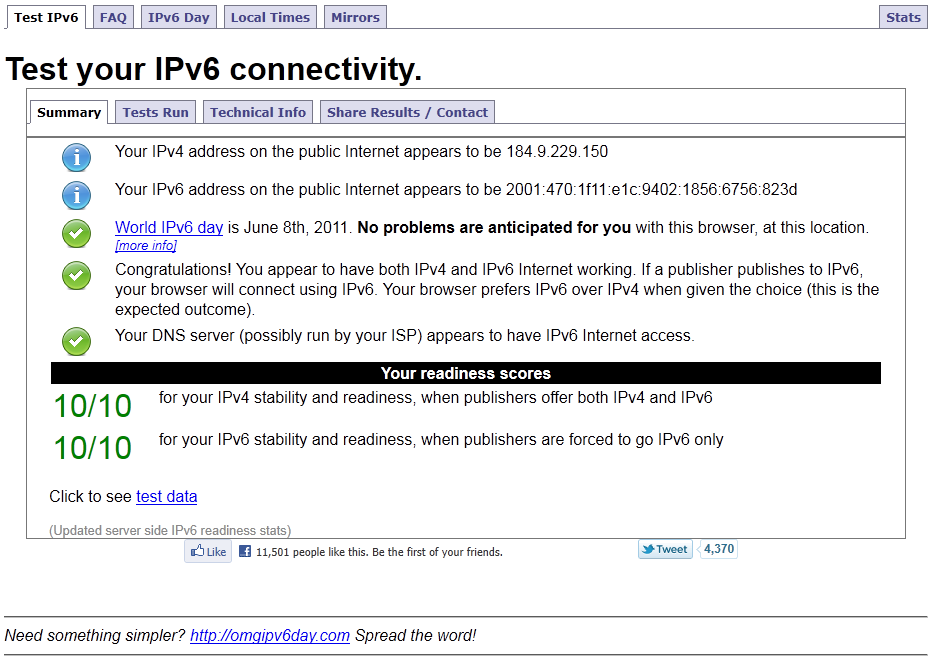
Try it out!
At this point a LAN client should be able to pick up an IPv6 Address and find the pfSense firewall as it is now advertising itself on the LAN. This can be checked with http://test-ipv6.com if the IPv6 connection is successfully detected.
Keep the Tunnel Endpoint Up-To-Date
If the WAN connecting the tunnel has a dynamic IP address, the HE.net Tunnelbroker DynDNS type may be used to update it when the WAN IP address changes.
To set that up:
Navigate to Services > Dynamic DNS
Click
Set the Type to HE.net Tunnelbroker
Select the proper Interface
For Hostname enter the numeric Tunnel ID from he.net
Enter the Username
Enter Password OR Update Key from the Advanced tab of the tunnel’s settings on tunnelbroker.net. Older accounts may not have an Update Key and may use only the password.
Enter a Description if desired
Click Save
More information
More information about IPv6 support may be found in the pfSense forum at https://forum.netgate.com/category/46/ipv6
World IPv6 Day may have passed, but now every day can be IPv6 day.