Configuring High Availability
This guide is brief and omits important considerations. The Hardware Redundancy chapter in the pfSense Book should be consulted before configuring a high availability cluster utilizing CARP.
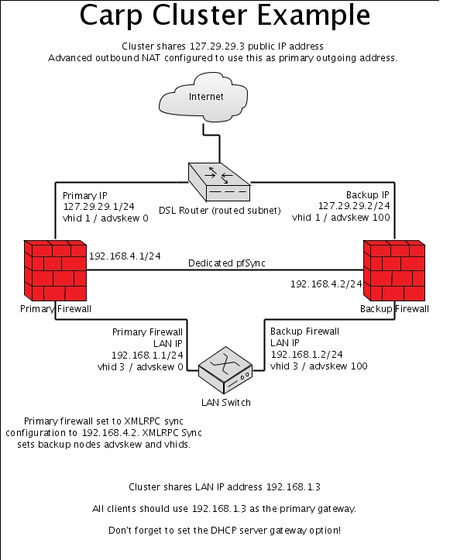
Overview of a pfSense® High Availability Setup
One real IP address is required for every CARP cluster node. To have 2 cluster nodes, 2 IP addresses are needed for the real interfaces and then an additional IP for each CARP type virtual IP address. In this case it would amount to 3. In the example shown to the right, the IP address of the primary CARP cluster node WAN is 127.29.29.1 and the IP address of the secondary node WAN is 127.29.29.2. The IP address of the primary cluster node LAN is 192.168.1.2 and the IP address of the secondary node LAN is 192.168.1.3.
Setup a Dedicated Sync Interface
We strongly advise using a dedicated interface for synchronization, especially for state synchronization, handled using pfsync. This is not only for security purposes, but for resource utilization as well. State synchronization can consume significant amounts of traffic in a busy environment.
Set up each cluster Sync interface, give it an IP address in the same subnet. Example: on the primary cluster node enter 192.168.4.1 and on the secondary cluster node enter 192.168.4.2 for the IP address. Use a /24 subnet.
Add Firewall Rules for Synchronization
Before configuring synchronization, add firewall rules to the Sync interface that will pass traffic between the nodes.
Navigate to Firewall > Rules on the Sync interface tab
Add a rule to pass traffic from the Sync Net to any destination.
This could be made more precise, with rules to only pass traffic to the firewall GUI port and for pfsync.
Enable State Synchronization (pfsync)
State synchronization should be enabled on all cluster nodes.
Navigate to System > High Avail. Sync
Check Synchronize States
Choose the correct Synchronize Interface for state synchronization
If using two cluster nodes, enter the sync interface IP address for the opposing node in pfsync Synchronize Peer IP.
Using the above example, the primary cluster node would have 192.168.4.2 set. The secondary node would have 192.168.4.1 set.
Click Save
Enable Configuration Synchronization (XMLRPC Sync)
Before proceeding, set the same user with the “System - HA node sync” privilege (or admin user), password and webGUI protocol (e.g. HTTPS) on each cluster node.
The configuration synchronization settings should only be enabled on the primary cluster node.
Navigate to System > High Avail. Sync
Enter the IP address of the secondary in Synchronize Config to IP (192.168.4.2 from the above example)
Enter the user with the “System - HA node sync” privilege (or admin user) for the Remote System Username
Enter the Remote System Password (the password should be the same on all nodes)
Check boxes for the desired configuration areas to sync. Typically all of these will be selected.
Click Save
The chosen areas will synchronize to the secondary node once the settings have been saved.
Setup Manual Outbound NAT
Navigate to Firewall > NAT on the Outbound tab
Select Manual outbound NAT
Click save
Edit the automatically added rule for LAN
Select a shared CARP virtual IP address on WAN as the Translation address
Change the Description to refer to the rule’s use of the CARP VIP if desired
Click Save
Repeat the rule edit for additional rules
Click Apply changes
Note
Never add outbound NAT rules that could match the WAN/Public IP addresses of the cluster. This includes rules that have the public IP addresses listed explicitly and also rules that have This Firewall (self) or any set as a source. These NAT rules will cause other problems/unintended behavior, and will break outbound connectivity from the secondary node when it is in a BACKUP state.
Set DHCP Server to Use CARP LAN IP Address
Navigate to Services > DHCP Server on the primary node
Click the LAN tab
Set the default gateway to the CARP VIP on the LAN, e.g. 192.168.1.3
Set the DNS server to the CARP VIP on the LAN, e.g. 192.168.1.3
Enter the IP address of the secondary node in Failover peer IP. This will be automatically adjusted during synchronization.
Click save
Verify XMLRPC Synchronization
Visit the secondary cluster node and verify that NAT, Virtual IP addresses and rules have been synchronized correctly.
Verify CARP Status
On both nodes, check Status > CARP (failover). If either system shows a button labeled Enable CARP, click it.
On that page, verify that the VIPs show the proper status. On the primary node, each VIP should show MASTER. On the secondary node, each VIP should show BACKUP.
That’s it, Enjoy!
Troubleshooting
See CARP Configuration Sync Troubleshooting and CARP Configuration Troubleshooting for more information on correcting issues. A few common issues are listed below.
VMware ESX Users
Enable promiscuous mode on the vSwitch
Enable “MAC Address changes”
Enable “Forged transmits”
ESX VDS Config
If a Virtual Distributed Switch is being used, it is possible to make a port group for the firewall interfaces with promiscuous mode enabled, and a separate non-promiscuous portgroup for other hosts. This has been reported to work by users on the forum as a way to strike a balance between the requirements for letting CARP function and for securing client ports.
KVM+QEMU Users
Be sure to use e1000 NICs (em(4)), not the ed(4) NICs or CARP VIPs will never leave init state.